

How To Install a B&I Dash Kit
Before learning how to install a B&I dash kit, it is important to understand why we use premium adhesive and why we package our dash kits on liner sheets.
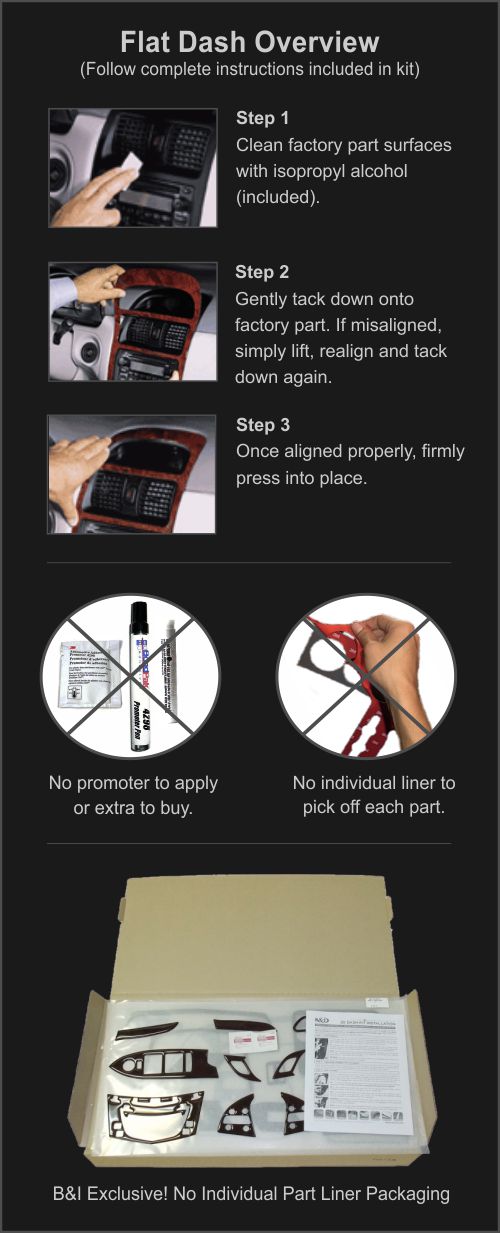
While we could cut our costs down by using 'no name' brand adhesives (or even the cheaper 3M™ 4229P) with typical red liner backing on every part, IF if we did, B&I wouldn't have the easiest, safest and most secure installation system available.
3M™ 5849 is the premium acrylic foam adhesive for dash kits, featuring maximum bond-strength and built-in primer. Cheaper, 'alternative' dash kits require you to apply adhesive primer to each factory part prior to installation. This process is tedious and time-consuming (especially for 20+ piece kits) and, if a dash part is misaligned, it is very difficult to realign without damaging the factory part or dash part. On the other hand, a B&I dash kit with 3M™ 5849 allows you to re-position a part during installation for a perfect fit - a key benefit, especially for first-time installers.
Primer pens and pads also leak unexpectedly, a common problem which can damage uncovered factory parts. And, primer is toxic, which may be harmful to skin on contact. Finally, since only one small primer pen or pad is generally provided, you may need to purchase extra primer to complete your installation.
Another key feature to B&I's exclusive installation system is that we package our flat dash parts on clear liner sheets, so you just 'lift & stick'. This feature saves you the time and trouble of picking individual red liner off each dash part prior to installation.

Call Free 1.800.382.6164
B&I Trim Products, Inc.
The Premium Choice Since 1986
Copyright © 2026. All rights reserved.